How To Add An Asset Type
 Noah Parker
21 Jun 2026
This guide walks you through creating an asset type in Payrun. By the end, you will have a named asset category with a custom icon and assigned properties, ready to use when adding assets.
Asset types group similar company assets, such as Laptops, Mobile Phones, or Office Chairs, under a single category. Each type can carry its own set of properties, so every asset in that category captures consistent, structured information.
Before You Begin
Make sure you have the following before proceeding:
Admin or Settings access in your Payrun account
Asset properties already created (if you plan to assign any)
A clear idea of the asset category you want to create
Step 1: Open Asset Settings
Log in to your Payrun account.
Click Settings in the left sidebar.
Select Assets.
The Asset Settings page will open.

Step 2: Start Creating An Asset Type
Under the Asset Type section:
Click Add.
The Add Asset Type page will open.

Step 3: Enter The Asset Type Name
In the Type field, enter a name that clearly identifies the category. Use a name your team will immediately recognize.
Examples:
Laptop
Mobile Phone
Monitor
Office Chair
Headphone
Printer

Step 4: Select An Icon
Each asset type displays an icon throughout Payrun to help users quickly identify the category at a glance.
Click the Icon dropdown.
Browse the available icons.
Select the icon that best represents the asset type.

Step 5: Assign Asset Properties
Properties define what information gets collected for every asset under this type. For example, a Laptop type might require Brand Name and Serial Number, while an Office Chair type might only need Condition and Purchase Date.
Click Select Properties.

Choose the properties relevant to this asset type.

Click Select to confirm.
The selected properties will appear in the Properties section.
Note: If no properties exist yet, you can skip this step and add them later by editing the asset type. Properties must be created in advance under Asset Settings before they can be assigned here.
Step 6: Save The Asset Type
Before saving, review the following:
The type name is correct and clearly identifies the category.
The right icon is selected.
The correct properties are assigned.
Click Add to save the asset type.
Payrun will create the new asset type immediately.

Step 7: Verify The New Asset Type
Confirm the asset type was created successfully:
Return to the Asset Settings page.
Click Manage under Asset Type.
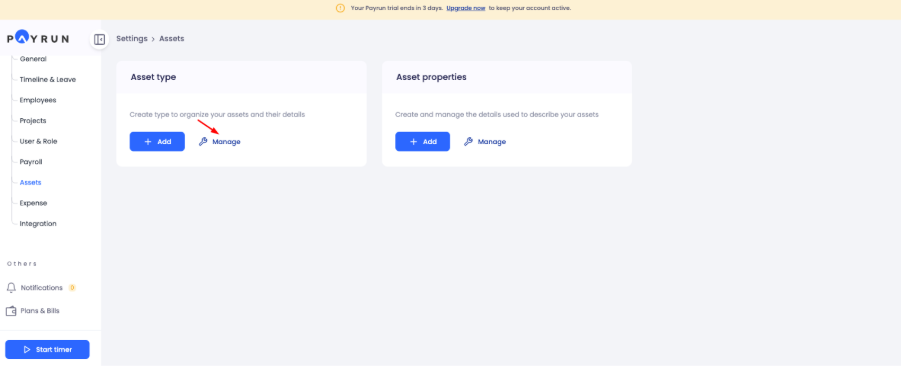
The Asset Types list will display each type with:
Asset type name
Number of properties assigned
Number of assets currently using that type
Your newly created asset type should appear in the list. If it does not appear, refresh the page and check again.

Managing Existing Asset Types
From the Asset Types page, click the three-dot menu (…) beside any asset type to access the following options:
Edit — Update the name, icon, or assigned properties.
Delete — Remove the asset type from the system.
Warning: Deleting an asset type is permanent. Before deleting, ensure no active assets are assigned to that type. Assets using a deleted type may lose their category association. Reassign or remove those assets first to avoid data inconsistencies.
Next Steps
Now that your asset type is ready, you can:
Add individual assets and assign them to this type.
Create additional asset types for other categories.
Define more asset properties to capture richer asset data.
Run asset reports filtered by type for better inventory visibility.