Payrun Timeline Settings Guide: Complete Feature Overview
 Noah Parker
09 Aug 2026
The Timeline & Leave settings in Payrun help you control how employee time logs, attendance, and leave requests are recorded, reviewed, and approved. These settings allow organizations to define approval rules, attendance tolerance, tracking restrictions, and safeguards to ensure accurate and compliant time data.
From this section, admins can configure policies that directly affect how employees submit time entries, how approvals are handled, and how attendance behaviour is evaluated across the organization. Each option can be adjusted based on operational needs, team structure, and compliance requirements.
Accessing Timeline Settings
The Timeline settings allow you to control how employee time logs are recorded, approved, restricted, and validated. These settings help ensure accurate attendance tracking, reduce manual review, and prevent incorrect or unauthorized time entries.
Log in to your Payrun account.
From the left sidebar, click Settings.
Select Timeline & Leave.
Open the Timeline tab.

Auto Approval
The Auto approval section defines whether time entries are automatically approved when submitted.
Timer Entry
Timer entry controls time logs added automatically using the timer.
When enabled, all timer-based time logs are considered approved automatically.
When disabled, timer-based logs require review.
Toggle the switch to enable or disable this option.
Manual Entry
Manual entry applies to time logs added manually by users.
When enabled, manually added time logs are considered approved.
When disabled, manually added logs require approval.
Toggle this option based on how strictly you want to review manual time submissions.
Arrival Time Tolerance
The Arrival time tolerance setting defines how much delay is allowed when evaluating employee attendance.
This value is used to monitor and assess attendance performance.
Example: 15m means arrivals within 15 minutes are tolerated.
Edit Arrival Time Tolerance
Click Edit.
Update the tolerance value.
Save your changes.

IP Tracking
The IP tracking section restricts time log submissions based on approved IP addresses.
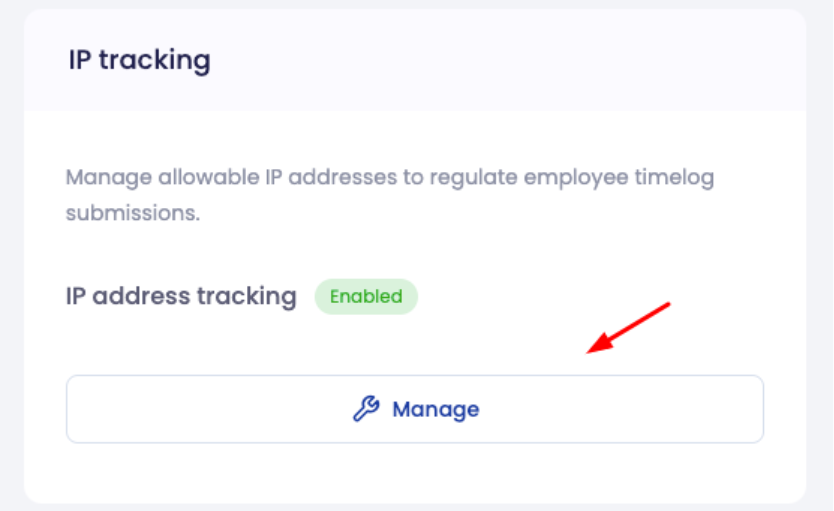
Enable IP-Based Tracking
Turn on Enable IP-based tracking to monitor time-log submissions based on IP address.
When enabled, employees can submit time logs only from allowed IPs, depending on system behaviour settings.

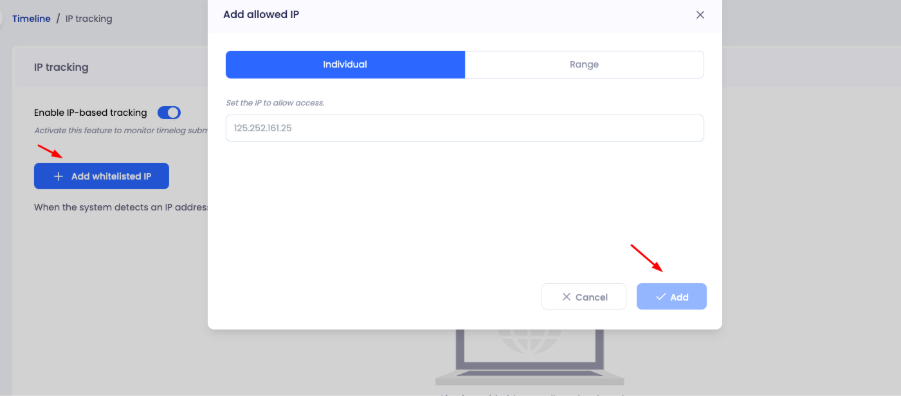
Add Whitelisted IP
Click Add whitelisted IP.
In the Add allowed IP window, choose one of the following:
Individual – to allow a single IP address
Range – to allow a range of IP addresses
Enter the IP address or range.
Click Add.
Action for Non-Listed IPs
Use the dropdown next to When the system detects an IP address not listed below, the system will
Choose how Payrun behaves when an unapproved IP is detected (for example, take no action).
If IP tracking is enabled but no IPs are added, a message indicates that no allowed IPs are set.

No Approve Policy
The No approve policy allows selected users to submit time logs without any approval process.
No Approval Required
When enabled, selected employees can submit time-log requests without review.
This reduces approval workload for trusted users.
Add People
Click Add people.
Search and select the employee(s).
Click Add.

Only the added employees will be excluded from timelog approval requirements.

Time-log Threshold
The Timelog threshold helps flag unusually long timelogs that exceed standard workshift hours.
Set Threshold Percentage
The threshold is defined as a percentage (for example, 50%).
Any timelog exceeding this threshold is flagged for review.
Auto Timelog Stop
When enabled, the timelog automatically stops once the threshold is reached.
This helps prevent excessive or accidental time logging.

Edit Timelog Threshold
Click Edit.
Adjust the percentage using the slider or input field.
Enable or disable Auto timelog stop as needed.
Click Save.

Manage Timelog Tasks
You can manage the tasks employees use when recording their time from the Timelog Tasks section.

Add Or Edit Tasks
Select Edit to open the task list. From there, you can:
Add a new task by entering its name in Add new task and selecting +.
Edit an existing task by changing its name.
Drag and drop tasks to change their order.
Remove a task with the delete icon.

Set A Default Task
Under Default task, choose the task you want Payrun to select automatically when someone creates a timelog entry.
Select Save when you're done. Select Close if you want to exit without saving your changes.