How To Add An Expense Claim
 Noah Parker
25 Jun 2026
Expense claims help employees submit business-related expenses for reimbursement and approval. Payrun allows users to create expense claims, add individual expense entries, attach supporting documents, and track approval statuses from a single location.
Prerequisites
Before creating an expense claim, ensure that:
You have access to the Finance module.
The employee has been added to Payrun.
Expense categories are available in the system.
Supporting documents such as invoices or receipts are ready if required.
Step 1: Navigate To Expenses
From the left sidebar:
Click Finance.
Select Expenses.
The Expenses page displays all existing expense claims along with their statuses.

Step 2: Create A New Expense Claim
Click Add expense claim at the top of the page.
Payrun opens the expense claim form.

Step 3: Select The Employee
Under the Employee field:
Open the dropdown menu.
Select the employee for whom the expense claim will be submitted.
The selected employee will become the owner of the expense claim.
Step 4: Enter The Claim Title
Enter a clear and descriptive title in the Title field.

Step 5: Add Expense Details
Under the Expense Details section, click Add expense.
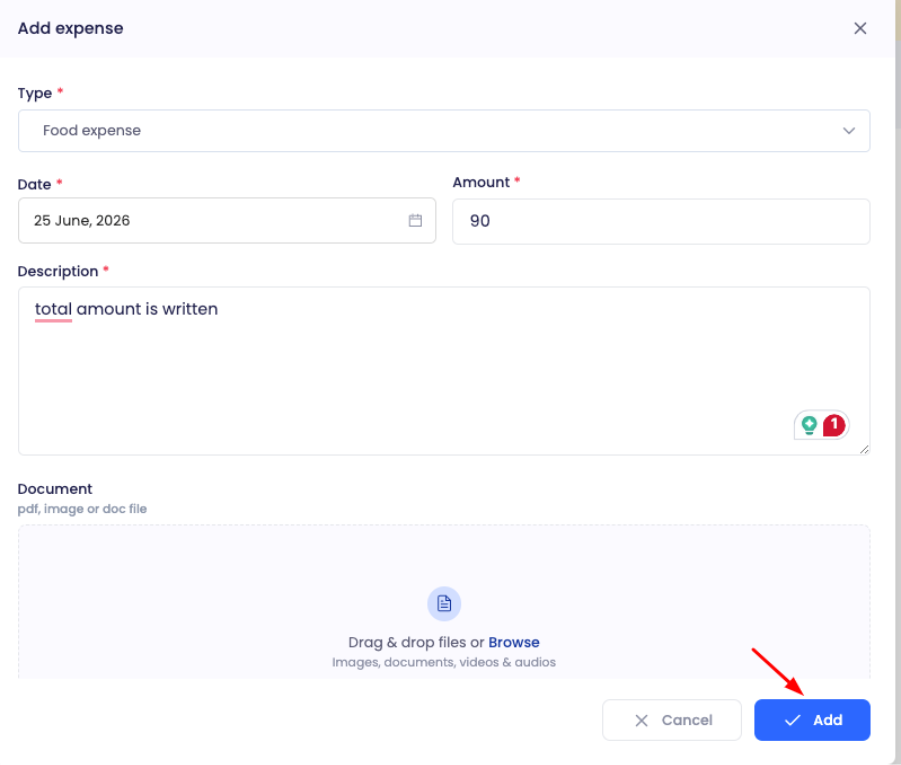
The Add Expense window appears.

Step 6: Enter Expense Information
Complete all required fields.
Type
Select the appropriate expense category.
Example:
Food expense
Date
Choose the date when the expense occurred.
Amount
Enter the expense amount.
Example:
$90
Description
Provide details about the expense.
Example:
Total amount is written.
Document
Upload supporting files if available.
Supported file types include:
PDF files
Images
DOC files
Supporting documents help approvers validate expenses more quickly.

Step 7: Save The Expense Entry
After entering the required information, click Add.
The expense item is added to the Expense Details section.
You can review:
Expense type
Expense date
Description
Amount
You may edit or remove the expense before submitting the claim.
Step 8: Add Additional Notes
Use the Note field to provide additional information if necessary.
Examples:
Approved by department manager.
Receipt submitted separately.
Client meeting reimbursement.
This field is optional.
Step 9: Submit The Expense Claim
Review all information carefully.
Click Add at the bottom of the page.

Payrun saves the expense claim and submits it for approval.
Verify The Expense Claim
After submission, the expense claim appears in the Expenses list.
The status indicates the current approval stage.

Result
The expense claim is successfully created and submitted. Managers or authorized approvers can review the claim, approve it, or reject it according to the organization's approval workflow.
Best Practices
Use descriptive claim titles.
Add accurate expense descriptions.
Attach receipts whenever possible.
Verify expense amounts before submission.
Submit claims promptly to avoid approval delays.
Next Steps
After submitting an expense claim, you can:
Track approval status.
View approved expenses.
Review rejected claims.
Edit pending claims if permitted.
Generate expense reports.